Code intelligence
DETAILS: Tier: Free, Premium, Ultimate Offering: GitLab.com, GitLab Self-Managed, GitLab Dedicated
Code intelligence adds code navigation features common to interactive development environments (IDE), including:
- Type signatures and symbol documentation.
- Go-to definition.
Code intelligence is built into GitLab and powered by LSIF (Language Server Index Format), a file format for precomputed code intelligence data. GitLab processes one LSIF file per project, and Code intelligence does not support different LSIF files per branch.
SCIP is the next evolution of tooling for indexing source code. You can use it to power code navigation features, such as:
- Go to definition
- Find references
GitLab does not natively support SCIP for code intelligence. However, you can use the SCIP CLI to convert indexes generated with SCIP tooling into a LSIF-compatible file. For discussions on native SCIP support, see issue 412981.
For progress on upcoming code intelligence enhancements, see epic 4212.
Configure code intelligence
Prerequisites:
- You've checked to ensure there is a compatible indexer for your project's languages:
To see how your language is best supported, review the indexers recommended by Sourcegraph.
With the CI/CD component
GitLab provides a CI/CD component to configure code intelligence
in your .gitlab-ci.yml file. The component supports these languages:
- Go version 1.21 or later.
- TypeScript or JavaScript.
- Java 8, 11, 17, and 21.
To contribute more languages to the component, open a merge request in the Code intelligence component project.
-
Add a GitLab CI/CD component to your project's
.gitlab-ci.yml. For example, this job generates the LSIF artifact forgolang:- component: ${CI_SERVER_FQDN}/components/code-intelligence/golang-code-intel@v0.0.3 inputs: golang_version: ${GO_VERSION} -
For configuration instructions for the code intelligence component, check the
READMEfor each supported language. -
For more configuration details, see Use a component.
Add CI/CD jobs for code intelligence
To enable code intelligence for a project, add GitLab CI/CD jobs to your project's .gitlab-ci.yml.
::Tabs
:::TabTitle With a SCIP indexer
-
Add a job to your
.gitlab-ci.ymlconfiguration. This job generates the SCIP index and converts it to LSIF for use in GitLab:"code_navigation": rules: - if: $CI_COMMIT_REF_NAME == $CI_DEFAULT_BRANCH # the job only needs to run against the default branch image: node:latest stage: test allow_failure: true # recommended script: - npm install -g @sourcegraph/scip-typescript - npm install - scip-typescript index - | env \ TAG="v0.4.0" \ OS="$(uname -s | tr '[:upper:]' '[:lower:]')" \ ARCH="$(uname -m | sed -e 's/x86_64/amd64/')" \ bash -c 'curl --location "https://github.com/sourcegraph/scip/releases/download/$TAG/scip-$OS-$ARCH.tar.gz"' \ | tar xzf - scip - chmod +x scip - ./scip convert --from index.scip --to dump.lsif artifacts: reports: lsif: dump.lsif -
Depending on your CI/CD configuration, you might need to run the job manually, or wait for it to run as part of an existing pipeline.
:::TabTitle With a LSIF indexer
-
Add a job (
code_navigation) to your.gitlab-ci.ymlconfiguration to generate the index:code_navigation: rules: - if: $CI_COMMIT_REF_NAME == $CI_DEFAULT_BRANCH # the job only needs to run against the default branch image: sourcegraph/lsif-go:v1 allow_failure: true # recommended script: - lsif-go artifacts: reports: lsif: dump.lsif -
Depending on your CI/CD configuration, you might need to run the job manually, or wait for it to run as part of an existing pipeline.
::EndTabs
NOTE:
GitLab limits the artifact produced by the code generation jobs to 200 MB by the
(ci_max_artifact_size_lsif)
artifact application limit. On self-managed installations, an instance administrator
can change this value.
View code intelligence results
After the job succeeds, browse your repository to see code intelligence information:
-
On the left sidebar, select Search or go to and find your project.
-
Select Code > Repository.
-
Go to the file in your repository. If you know the filename, either:
- Enter the
/~keyboard shortcut to open the file finder, and enter the file's name. - In the upper right, select Find file.
- Enter the
-
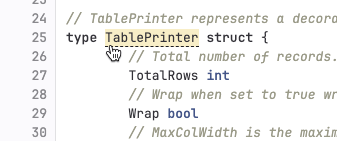
Point to lines of code. Items on that line with information from code intelligence display a dotted line underneath them:
-
Select the item to learn more information about it.
Find references
Use code intelligence to see all uses of an object:
-
On the left sidebar, select Search or go to and find your project.
-
Select Code > Repository.
-
Go to the file in your repository. If you know the filename, either:
- Enter the
/~keyboard shortcut to open the file finder, and enter the file's name. - In the upper right, select Find file.
- Enter the
-
Point to the object, then select it.
-
In the dialog, select:
- Definition to see a definition of this object.
- References to view a list of the files that use this object.

